

Thus far in my Breaking Down The Roof series, we’ve covered the steps of preparing for the new roof, removing the existing roof, and installing the underlayment. For this session, I will discuss the flashing (get your mind out of the gutter, well, there is gutter flashing…nevermind), and how it keeps water out of your home.
Flashings
Flashing is a very generic term that is used for several different areas of the roof. The best description is that a flashing is a material that will prevent water from entering around a penetration, pitch change, or edge.
Drip Edges
The first flashing to be installed on your roof is the metal drip edge that is installed at the rakes and eaves. There are several options available, but the most common in Southeast Texas is a galvanized drip edge. Your contractor might call it “eave flashing”, “eave metal”, “gutter flashing”, or “fascia flashing”. Each of these generic terms can fit the same family of flashing.
I typically specify a 2″x2″ prepainted drip edge for my clients, but of course, that is dependent upon the situation at hand. I do highly recommend using a prepainted drip edge, if available. Many contractors, especially home builders, cut this critical corner! In an attempt to lower their job cost, they will either install a shiny galvalume drip edge that will stand out and eventually rust, or not even install any to begin with!
Drip edge is necessary for a couple of reasons. First, it works in conjunction with the starter strip to prevent windblown rain from getting underneath the first course of shingles, which will cause leaks and allow the decking to start rotting. Secondly, it helps prevent the wooden fascia from rotting out at the roof edge. Water will naturally roll under the shingle. The drip edge helps to ensure that the wood fascia is protected.
Valley Flashing
The next areas to be flashed are the valleys. Valleys are one of the most leak prone areas on a roof, but they don’t have to be. When flashed properly, a valley shouldn’t be an issue.
There are 2 primary types of materials that are used to flash a valley. The first is valley metal that has been around for many years. The valley metal typically comes in a roll, with varying widths being available but the most common is 20”. It may also be rigid, pre-formed 10’ sections called W-Valley. W-Valley is commonly used with higher end designer shingles that are thicker than typical architectural shingles. Having a W-Valley installed requires leaving the metal exposed, which may cause rusting and allow wind driven water along the edges.
The preferred material for most professionally installed roofs is a film surfaced leak barrier, or ice & water shield. One such ice & water shield is the GAF StormGuard. For example, StormGuard is 36” wide, which allows for increased protection against windblown water from entering under the shingles in the valley.
Many leak barriers are self-healing, meaning that as nails penetrate the membrane, the material seals around them to prevent water from entering around the nails. These leak barriers can also be used around other leak prone areas, such as vent flashings & chimneys. In parts of the country that receive a lot of snow, it is often required that a leak barrier be installed along the rakes and eaves to prevent melted snow and ice from backing up beneath the shingles in an ice dam.
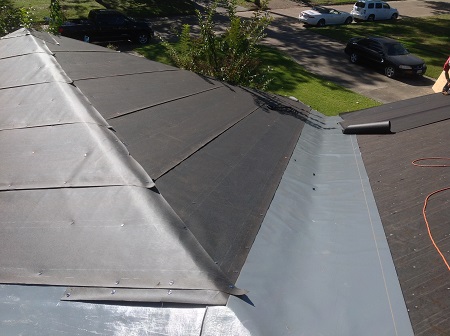
There are different ways to install shingles into valleys, but my preferred method is to have a closed valley, where the shingles are laced, and then trimmed for a nice, clean appearance. Other options are to have them fully laced into each other, or have the exposed valley (as I mentioned above).
Chimney & Sidewall Flashings
When replacing a roof, you also must install new flashing at the chimney and sidewalls. The type and style of flashing to be installed at sidewalls depends several factors, such as chimney or sidewall material and the condition of that material.
For brick or stucco, it is generally preferred to install a tin shingle & counter flashing system. When it comes to vinyl or wood siding, a tin shingle flashing system is preferred. While more labor intensive than an L-flashing system, it makes for a longer lasting job.
Vent Flashings
The flashings around plumbing penetrations is one of the areas where I make most of my repairs. These vents allow the gases that accumulate in your sewage plumbing pipes to escape to the outside, instead of inside, of your home. Other vents on your roof might be bathroom or stove vents, or water heater and furnace vents.
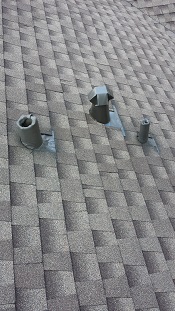
Most home builders and lower-end contractors will install a rubber boot flashing that will keep the water out for a short time. Eventually these rubber boots crack in our Texas heat. I usually figure the lifetime of a rubber boot flashing to be about 8 years. Once you have 1 crack on your roof, you typically have others that will crack and leak within the next few months. What I recommend is to install a metal flashing called a “lead jack” to the plumbing pipe. This is a solid piece that is installed over the top of the pipe. It is then folded in to prevent water from entering between the flashing and the pipe. The only detriment to lead jacks is that they are susceptible to damage from squirrels. Squirrels use them to whittle down their teeth, and if chewed on long enough, will eventually leave openings for water to enter. Every few years, a new product will come onto the market that claims to be more durable, however, I have yet to find one that withstands our needs in Texas. Even the silicone ones seem to have issues.
Hood vents are often used for stove and bathroom vents. These are usually not prone to damage from squirrels because the metal is harder on their teeth. They do have larger openings that are susceptible to heavy wind driven rain.
I do receive calls on occasion for water heater and furnace vents that area leaking. The source of most of these leaks is around the storm collar. Even if properly secured and sealed, it can become loose in high winds. Usually is just needs to be re-seated and re-sealed. When you are in the attic, you might notice some light coming through, even if it is not leaking. This is normal. Just be sure to keep an eye on it, and if you have any water coming through, be sure to get it fixed immediately.
In my next post, we will finally get to the point of installing shingles! Well, the starter shingles…
Until next time,
Travis Diekmann
The Texan Roofer